The Torah Tie Project
Before I begin, I have to give a big shout out and todah rabah to the Toronto Pomegranate Guild's online Lunch and Shmooze initiative. Without it, I would never have known about the ties nor have taken photographs and emailed them to the POM to share at the Lunch and Shmooze so I would have no photos or timeline of The Torah Tie Project (the "Project")
Towards the end of April, 2021, I was gifted four plastic shoe boxes of silk ties. I was reluctant to take them because my previous tie project "Marty's Ties" was daunting.


I convinced myself that the ties were merely FREE silk fabric and didn't necessarily have to be used in one project.
I briefly referred to this book which I had used for Marty's Ties to remind me how to prepare
the ties for the Project.

The
first thing I did was chuck the ties into the washing machine and dryer,
not that they required washing for cleaning purposes but because if the
fabric was too delicate to withstand a washing and drying cycle, I
wanted to know before I started working on them. They all survived. (Approximately May 1, 2021)

The next step was gutting the ties - removing the labels and linings, and the linings at the narrow and wide triangle ends of the tie. This a long and labourious task as I didn't want to damage the silk with the seam ripper.
As I was gutting the ties, I thought about Stan, the man whose wife, Fran, had gifted me her late husband's ties. I went to the funeral home website and read not only the obit, but also the condolence messages. Many of them referred to how elegantly he was dressed when he attended synagogue services and several messages referred to his ties.
I got to thinking about how much Torah the ties must have absorbed, week by week, year by year, through the Torah reading cycle. I started to think of a project which would encompass the weekly Torah parashot using the tie pieces. And so the Torah Tie Project began.
Aside from this bag of tie guts,
The book I referred to earlier suggested cutting standard sizes of fusible and adhering it to the ties and then cutting around the fused pieces. (If you fuse the entire tie and then cut out the pieces, you waste quite a bit of fusible which is not cheap). So I cut the pieces out as follow:
5" squares where possible from the widest part of the tie and 3" by either 3", 6" or 12" from the rest, avoiding wherever the tie had seams. The layout looked like this:

These are the pieces before trimming:


And these are the trimmed pieces.

And these are the cut-offs but I'll get to those later, much later.

Not to mention the strips used to hold the tie in place, and the labels:

When I received the ties, I asked Fran if I could make her a wallhanging from the ties. She said she'd like a cushion. What colour, I asked. Red.

It now resides at Fran's.
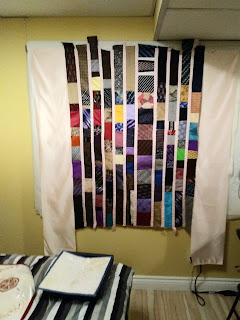
I initially thought of making a quilt. I put the pieces up on my design wall.

These were the 5" squares. In the picture it doesn't look too bad but on the wall, it looked rather dark. So I tried this version where I left space between the squares.

I still didn't like it. So I sat and thought and thought. And came up with this layout for each parasha (Torah reading):

The pink would be the name of the parasha and the green would be the tie pieces. But what would separate them. Well, other than being gifted the silk ties, my friend Brenda had previously gifted me a bag of silk pocket squares that perhaps I could find a use for and they were perfect for this project.
Next step - putting the names of the parashot onto fabric. What fabric, you ask. Well my cousin, Alissa, gifted me her wedding gown. Ritche, no less. I ruthless cut it into 3" by 12" strips, backed with fusible. But how to do the lettering? I initially tried embroidery but decided against it because I'm not that good at straight line embroidery, and beading, but I don't have that much patience. In the end, I decided to stencil the Hebrew letters.
This is the wedding fabric strips ironed onto fusible stabilizer:

I made my own stencils by tracing the words onto freezer paper, cutting out the letters, and ironing the freezer paper onto the wedding gown fabric. I decided to do the letters in black so there would be some uniformity to the design. I used black fabric paint from G&S Dyes.
These are some of the stencils:

I made my own stencils by tracing the words onto freezer paper, cutting out the letters, and ironing the freezer paper onto the wedding gown fabric. I decided to do the letters in black so there would be some uniformity to the design. I used black fabric paint from G&S Dyes.
This is the process:
1.

2. Iron stencil onto wedding fabric:

3. Paint over stencil:

4. Peel off stencil:
 ncil
ncilSo this is the pre-sewing arrangement of parashot and tie pieces:

Parashot pinned to ties of their blocks:

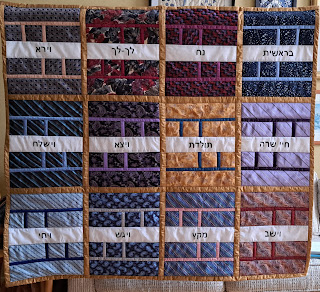
My first finished block was this:

Now comes the sewing together part for the tops. For each book, I had 12 blocks.
I decided to join the blocks with sashing. When Carmit was visiting from Munich, we went to a quilt shop in Dundas, Ontario. Although even then I was purposely not buying fabric unless absolutely needed to finish a project, the quilt shop was going out of business, partly because the owner wanted to retire but also partly because she was having supply chain issues. I bought a 2 meter piece of beige-grey batik. When auditioned for the TTP block sashing, the batik just looked washed out. So off Menachem and I went to Lens Mills and I opted for a silk fabric in gold. I think it was actually fabric left over from when Designer Fabric Warehouse closed and Lens Mills bought out their stock. When I was in my crazy quilting with fancy fabric days, I used to go down to DFW on Queen Street and ogle their silks. Didn't buy much because they had a minimum 1 meter cut policy and I never needed that much of one fabric. I preferred to buy duppioni silk on sale at Fabricland. Fabricland stopped selling duppioni at approximately the same time I paused my crazy quilting obsession.
I cut the gold silk into 1.5" strips and sashed away. Here is the first finished top, Sefer Bereshit:

My sewing room is in my bedroom, so excuse the bed. At least I made it...
Not all of the quilts have 12 parashot. The ones below, for example have "blanks" on the bottom left. I still have to figure out how to finish them. I have an idea involving more stencilling of "chazak, chazak v'nitchazek, one word of the quilts and ab applique of wedding dress lace in the leftover blanks.


I am now leaving the fronts to work on the quilt backs. Remember the cutoffs?
I decided to use them for the backs, interspersed with leftover pieces from the silk handkerchiefs from Brenda. And I made these:

I am now working on the second one with bridesmaids' dresses from my sister's wedding.
So now, January 26, 2022, I think I am finally ready to publish a post about what I have done to date. In will add new posts as I progress.
And again, a big shout out to the POM L&S without which I would never had documented my progress on the project.
The project had stalled in January 2022 and did not proceed until Carmit came from Munich for a visit. She agreed to longarm the quilts for me but advised me not to use the backings I had made. Instead, we bought new batting and backing at The Quilt Store in Newmarket where I had rented time on their longarm machine. Carmit spent six hours longarming the quilts, doing stitch in the ditch so as not to detract from the tie designs. She also helped me with the facing.
And here they are:


Am I relieved? Yes. Do I feel an enormous sense of accomplishment? Yes.
Thanks for reading.
Comments
Post a Comment